I like shopping the old fashioned way. I like to physically see my options, compare them, maybe even touch them. I like to pick up my selections and put them into the cart. A real cart. A cart that has wheels and the only problem it might have is a wobbly or noisy wheel, or it might be a bit hard to steer. Despite a wobbly wheel, a squeek or difficult steering, it will go where I want it to, when I want it to, and it will only hold what I put into it. Then, when I decide I've found everything I want, I can place the items onto the sales counter or checkout stand, watch it being rung up, be sure prices ring up correctly, see the total and make my purchase, knowing that I have everything I want, nothing more, nothing less, and leave with it in my hands.
These days, even though we have big stores with lots of stuff and even lots of little shops, the things I want aren't always available. So, to get these things, I have to resort to cyber shopping. Ugh! It's something I don't enjoy. It's hard to compare items...all the back and forth and waiting for screens to change is annoying. I can't touch the items and I have to hope that the colors I'm seeing on my screen are somewhere close to the actual color the item(s) will be when I recieve them. Then...there are computer glitches!
Right now, I need some yarn to make Christmas gifts and have not been able to find what I want...despite numerous trips to yarn shops and craft stores. I kept going back and hoping that, miraculously, the yarns I wanted would appear. No such luck. I knew I could get what I wanted from Knit Picks but kept putting it off because I hate cyber shopping. But, Christmas is getting closer and closer and I knew I couldn't put it off any longer. So, to the Knit Picks site I went. What a mistake to do it yesterday though...on "Cyber Monday". Duh!
I kept trying all day to get their site to work and it just kept locking up. I think lots of other people may have been procrastinating on placing their orders too. The site finally started working late last night and I carefully placed things in my cyber cart. When I finished making my selections, I checked and re-checked my cart multiple times. It all looked good. I had bought just enough yarn to get free shipping. I then proceded to check out. Across the top it said something like, "items previously put into your cart have been added". Huh?! What was that supposed to mean? I checked and re-checked my cart again and it all looked good. So, I entered my credit card number and made my purchase. After that, the site didn't give me a screen with a confirmation number, order number, what I purchased...nothing! It just went to a screen that said my order has been placed. I hit the "back" button to see if I could find find an order number or something and a screen flashed for a couple of seconds and then went back to the one that said my order had been placed. But...the total on the screen that flashed was a lot more than what was on the screen of what I had purchased. Hmmmmm?! Could it have been those "previous" items that I couldn't figure out?
I called the 800 number but they were closed. I waited and kept checking for the order confirmation that the site said would be emailed to me within an hour. Hours later...nothing! My only option was to call them at 5am this morning when they open. I set my alarm, got up at 5, stumbled downstairs, checked my email and finally had that confirmation. There were multiples of yarn I had chosen. Ugh! I called up and was able change my order. Whew! I got through in time before it was packed and shipped. But, wait! The new total she gave me didn't seem right. I called again and she said it was the shipping charge. Oh...hmmmm?!...ok. I said "thank you" and I hung up. But...I had worked hard to make sure I ordered enough yarn to get free shipping! I started tapping away at my calculator (still sleepy....it was very early!) and realized that the amount was wrong on another yarn...there were only two balls instead of three. I called again to fix it but this time it was too late and it would cost more than that extra ball of yarn to ship it and I might not even get the same dye lot. Argh!
And...I thought I remembered Knit Picks operators being friendly and warm from previous orders...or was that was another store?! Regardless, they weren't very warm this morning...either it was because it was early or lots of other people were calling to get their "Cyber Monday" glitches fixed too.
Lesson learned...never shop on cyber Monday or any other day that the website I'm shopping on keeps locking up. And, if it says something weird like, "previous items have been added"....call them up before making the purchase...even if they aren't showing up in the cart. I've never had a problem before but I'm sticking to shopping the old fashioned way as much as I possibly can! It's so much better, I know what I'm really getting, what it's really costing before I pay, and I can walk out with it in my hands, ready to use and enjoy right away! And, besides...real carts are a lot more fun!
Now...I'm wondering...with all the shopping going on yesterday at Knit Picks...will I get my yarn in time to make all these gifts before Christmas?! I'm keeping my fingers crossed!
Tuesday, November 30, 2010
Wednesday, November 17, 2010
Something Special for Wesley
One of my knit friends is about to have a baby boy...Wesley! I'm so excited for her and her husband! As the special day approaches, we decided to have a little shower for her. I wanted to make something and I wanted it to be unique...something she wouldn't get a dozen of. I searched on Ravelry for just the right pattern and fell in love with the Owlie Sleep Sack. It's so cute and seems like a genious idea! I love the owls!...I've been wanting to make the sweater that has these owls around the neckline.
I made this with a washable, dryable yarn (a must for babies!), Bernat Satin. I think this green is pretty and it might go with the colors they like and chose for the nursery. It took a little less than one skein for the sack. I thought about making an owlie hat but thought that the owls on the sack would be enough. So, I knit up a basic little hat with a rolled edge to match the top of the sack. It was a fun project and oh-so-cute! Here it is with a book inside to make the owls easier to see...

It seems like a baby would feel so safe, snuggly and warm in this little sack and it can't fall open like a blanket could. Here it is without the book...

I also gave them this adorable pair of booties that I bought at a yarn shop. A local lady knits and sells them. It looks like they're made with sock yarn. I love the colors and the shape...

Here's a side view...

I made this with a washable, dryable yarn (a must for babies!), Bernat Satin. I think this green is pretty and it might go with the colors they like and chose for the nursery. It took a little less than one skein for the sack. I thought about making an owlie hat but thought that the owls on the sack would be enough. So, I knit up a basic little hat with a rolled edge to match the top of the sack. It was a fun project and oh-so-cute! Here it is with a book inside to make the owls easier to see...

It seems like a baby would feel so safe, snuggly and warm in this little sack and it can't fall open like a blanket could. Here it is without the book...

I also gave them this adorable pair of booties that I bought at a yarn shop. A local lady knits and sells them. It looks like they're made with sock yarn. I love the colors and the shape...

Here's a side view...

Shower Flowers
One of my knit friends is about to have a baby boy and we decided to turn this week's knit gathering into a baby shower. We've been busily making gifts (more about mine in the next post). A couple of us decided we needed some extras for the shower. So, she brought a balloon and she asked me to bring flowers. I wasn't sure I wanted to bring real flowers and an idea popped in my head...I wondered if I could use baby socks or washcloths to make flowers?! The idea was so exciting that I had to go for it!
I didn't find any socks that I would work but I did find a set of little washcloths that I liked. I also bought some paint to match the green on the washcloths as well as ribbon, a fancy piece of textured card stock paper for the leaves, a vase, and some shredded blue paper. I painted bamboo skewers for the stems. I folded the washcloths into thirds, turned down the top edge toward the bottom corner (on each end), placed a skewer inside near the end, and rolled it into a bud...

As I neared the other end, I folded it over to hide the edge. I then tied ribbon tightly around the bottom of each bud to hold it together and tied a pretty little bow.

For the leaves, I made a pattern, cut out one for each stem, punched two holes in the bottom of each, made a slight lengthwise bend in each leaf (to give it more dimension and a leaf-like shape) and slid a leaf onto each skewer...

I put shredded paper into a glass vase and arranged the buds. I cut the ends of some of the skewers to make some shorter so I could create a more pleasing arrangement. I then packed a little more shredded paper around the edges to hold the stems in place. Here's the result...

I'm really happy with how it turned out. The buds are so cute...

This project was fun, inexpensive and, unlike real flowers that will wither, these flowers can be put to good use.

I didn't find any socks that I would work but I did find a set of little washcloths that I liked. I also bought some paint to match the green on the washcloths as well as ribbon, a fancy piece of textured card stock paper for the leaves, a vase, and some shredded blue paper. I painted bamboo skewers for the stems. I folded the washcloths into thirds, turned down the top edge toward the bottom corner (on each end), placed a skewer inside near the end, and rolled it into a bud...

As I neared the other end, I folded it over to hide the edge. I then tied ribbon tightly around the bottom of each bud to hold it together and tied a pretty little bow.

For the leaves, I made a pattern, cut out one for each stem, punched two holes in the bottom of each, made a slight lengthwise bend in each leaf (to give it more dimension and a leaf-like shape) and slid a leaf onto each skewer...

I put shredded paper into a glass vase and arranged the buds. I cut the ends of some of the skewers to make some shorter so I could create a more pleasing arrangement. I then packed a little more shredded paper around the edges to hold the stems in place. Here's the result...

I'm really happy with how it turned out. The buds are so cute...

This project was fun, inexpensive and, unlike real flowers that will wither, these flowers can be put to good use.

Friday, October 29, 2010
Katia
I finished up a weaving project a couple of weeks ago. It's a scarf I'm calling "Katia", after the yarn I used, "Katia Colibri". I knitted a shawl/scarf with this kind of yarn about a year ago but in another colorway. The results were beautiful! I saw on Ravelry that someone had woven with it and I knew instantly that I had to give it a try. The colors and texture changes in this yarn are fabulous and it's so much fun to see how it all comes together in the finished fabric. I wove it in a simple plain weave with 12 ends per inch and used three balls of yarn, 669 yards.

The thin parts of the yarn create some sheerness..

The thick sections of turqouise and lime green add softness, color and texture...

The finished scarf is 8" wide by 92" long, including 4" of fringe on each end...

It's plenty long enough to drape around the neck and shoulders nicely...

I'm really happy with how it turned out.

I love this yarn and have seen a couple of other colorways that I really like. I would love to play with this yarn more...but...rumor has it that it's been discontinued. That won't stop me from dreaming about it and watching for it whenever I visit yarn shops! :-)

The thin parts of the yarn create some sheerness..

The thick sections of turqouise and lime green add softness, color and texture...

The finished scarf is 8" wide by 92" long, including 4" of fringe on each end...

It's plenty long enough to drape around the neck and shoulders nicely...

I'm really happy with how it turned out.

I love this yarn and have seen a couple of other colorways that I really like. I would love to play with this yarn more...but...rumor has it that it's been discontinued. That won't stop me from dreaming about it and watching for it whenever I visit yarn shops! :-)
Thursday, October 28, 2010
Studio Progress
The craft studio that I started blogging about months ago has seen some progress this week! Yay! We finally got the "Inspiration Wall" hung last night. Whew! What a job! I laid everything out on the floor and decided on an arrangement that I liked. Transferring a 57" x 62" grouping onto the wall with all those pieces was a bit challenging. However, it turned out pretty much like I had imagined with the exception of a little space left over in the bottom right corner. But, that's ok. I'm sure I'll find something for that spot, someday.
I love my yarn shop sign at the top! The magnet and tack boards will work great to pin up inspirational photos, lists, etc. And, yes...I decided to add a clock. It just fits so well in that space and will be useful. I usually listen to NPR (National Public Radio) or listen to music while I'm working. That should disguise the tick, tock sound. :-)

I love how the galvanized metal on the magnet board goes so well with the metal of the chandellier.

Look at the bottom...it looks like a little acorn...

I used a simple frame that I painted black, scrapbooking paper and ribbon to create a little piece of art to fill in one of the spaces and bring a little more pattern and color to the grouping...

This is a corner on the other side of my studio. I have an old ladder that holds quilts, fabric, etc. This corner also holds my warping board, a quilt hoop, my purple dress form, and some metal baskets that work great for holding yarn, project bags, etc.

Black is one of the colors that ties the room together...on the frames, the legs of the work table, and the bookcases on another side of the room. We had some particle board/picure wood bookcases that my husband painted black. What a transformation!

I use the top to hold an ever growing and useful supply of baskets, lazy kates, and even a dress form and head.

The shelves are filled with all sorts of things. I have knit, crochet, weaving, painting, quilting and lots of other crafty types of books and patterns as well as paints and brushes, scrap booking and jewelry making supplies, beach glass, some dried flowers for making potpouri...

An antique "McCoy" hand vase that I use to hold some things I need often...

I store buttons, fabric yo-yo's, tiny craft scissors, etc in vintage canning jars...

Vintage trims...

My little cast iron sheep watches over it all...

It's a wonderful space to work in with lots of natural light all day long. I love the work table we got too. It's counter height which works great to stand at or sit with the tall chairs. I can even change the size of it to make a square with four chairs or large rectangle with up to six chairs.

This room also has a small walk-in closet. I use it to store more craft supplies on shelves and in storage tubs.
This room is almost complete. All that's left to do is to make some little shutters for two small, square windows and to sew curtains for the larger window. We've been enjoying it for months now. Now that we have this inspiration wall, I have a feeling that a lot more creativity will be happening in this room!
I love my yarn shop sign at the top! The magnet and tack boards will work great to pin up inspirational photos, lists, etc. And, yes...I decided to add a clock. It just fits so well in that space and will be useful. I usually listen to NPR (National Public Radio) or listen to music while I'm working. That should disguise the tick, tock sound. :-)

I love how the galvanized metal on the magnet board goes so well with the metal of the chandellier.

Look at the bottom...it looks like a little acorn...

I used a simple frame that I painted black, scrapbooking paper and ribbon to create a little piece of art to fill in one of the spaces and bring a little more pattern and color to the grouping...

This is a corner on the other side of my studio. I have an old ladder that holds quilts, fabric, etc. This corner also holds my warping board, a quilt hoop, my purple dress form, and some metal baskets that work great for holding yarn, project bags, etc.

Black is one of the colors that ties the room together...on the frames, the legs of the work table, and the bookcases on another side of the room. We had some particle board/picure wood bookcases that my husband painted black. What a transformation!

I use the top to hold an ever growing and useful supply of baskets, lazy kates, and even a dress form and head.

The shelves are filled with all sorts of things. I have knit, crochet, weaving, painting, quilting and lots of other crafty types of books and patterns as well as paints and brushes, scrap booking and jewelry making supplies, beach glass, some dried flowers for making potpouri...

An antique "McCoy" hand vase that I use to hold some things I need often...

I store buttons, fabric yo-yo's, tiny craft scissors, etc in vintage canning jars...

Vintage trims...

My little cast iron sheep watches over it all...

It's a wonderful space to work in with lots of natural light all day long. I love the work table we got too. It's counter height which works great to stand at or sit with the tall chairs. I can even change the size of it to make a square with four chairs or large rectangle with up to six chairs.

This room also has a small walk-in closet. I use it to store more craft supplies on shelves and in storage tubs.
This room is almost complete. All that's left to do is to make some little shutters for two small, square windows and to sew curtains for the larger window. We've been enjoying it for months now. Now that we have this inspiration wall, I have a feeling that a lot more creativity will be happening in this room!
Wednesday, September 29, 2010
Scattered
I realized yesterday that I haven't posted anything on my blog in over a week. That's because I'm so scattered lately. I've been working on this and that but not really accomplishing much of anything. Sometimes I really wonder if I have ADHD! Here are some of the things I've been up to...
I finished knitting a bowl a few weeks ago and it's been sitting and waiting to be felted. I finally did this week!
I learned how to knit an i-cord right onto the top! That was so cool!...

Here it is after felting. It's nice and thick and holds the shape of the bowl edge very nicely...

Here's the whole thing before felting...

And, after...It's so cute! Now, all I need to do is give it a little haircut (it has mohair in it) and add some needle felted sheep, clouds, trees, etc...

My sister-in-law was given a few fleeces years ago and we sent them off to be processed into roving. I enjoyed spinning and spinning and spinning it (there was a lot) and I've knitted with it. This week, I pulled out what was left and wound it into balls and wet felted them. I'll use these to decorate with needle felting and pretty colors of wool...

I finally finished warping my loom this week and started weaving yesterday. I'm already on my third bobbin. I don't know why I don't do this more often. It's a lot of fun! Here's how this project is turning out, so far...

I finished winding all of the yarn on bobbins this morning. At the rate it's weaving up, it should be done in no time. Well, if I can stay focused that is. lol

I'm really happy with the selvedges. They're hardly pulling in at all...

In between those things, I've been knitting on my Olympic Shawl. I started it at the beginning of the year but it's gone in and out of time out as I've gotten interested in other things or frustrated with it or bored with it. I'm trying to keep working on it so I can get it done.
I also harvested another batch of fresh basil from my herb garden this week. I processed it and put it into the freezer for the winter. I need to dry some of the oregano and other herbs too. And, I've been doing house cleaning, laundry and I've been wasting a whole lot of time on Facebook and playing solitaire and majong on my laptop. I need to focus! I need to focus! lol
I finished knitting a bowl a few weeks ago and it's been sitting and waiting to be felted. I finally did this week!
I learned how to knit an i-cord right onto the top! That was so cool!...

Here it is after felting. It's nice and thick and holds the shape of the bowl edge very nicely...

Here's the whole thing before felting...

And, after...It's so cute! Now, all I need to do is give it a little haircut (it has mohair in it) and add some needle felted sheep, clouds, trees, etc...

My sister-in-law was given a few fleeces years ago and we sent them off to be processed into roving. I enjoyed spinning and spinning and spinning it (there was a lot) and I've knitted with it. This week, I pulled out what was left and wound it into balls and wet felted them. I'll use these to decorate with needle felting and pretty colors of wool...

I finally finished warping my loom this week and started weaving yesterday. I'm already on my third bobbin. I don't know why I don't do this more often. It's a lot of fun! Here's how this project is turning out, so far...

I finished winding all of the yarn on bobbins this morning. At the rate it's weaving up, it should be done in no time. Well, if I can stay focused that is. lol

I'm really happy with the selvedges. They're hardly pulling in at all...

In between those things, I've been knitting on my Olympic Shawl. I started it at the beginning of the year but it's gone in and out of time out as I've gotten interested in other things or frustrated with it or bored with it. I'm trying to keep working on it so I can get it done.
I also harvested another batch of fresh basil from my herb garden this week. I processed it and put it into the freezer for the winter. I need to dry some of the oregano and other herbs too. And, I've been doing house cleaning, laundry and I've been wasting a whole lot of time on Facebook and playing solitaire and majong on my laptop. I need to focus! I need to focus! lol
Monday, September 20, 2010
Framed - Memories
Part three of my "Framed" series is all about memories and the special touch they are going to add to the "inspiration wall" of my craft studio.
Last month, my favorite yarn shop closed down. I had shopped there for decades. I even went there with my mom when I was a kid! It had been around a long time, under various owners. The most recent owner was a sweet woman that somehow made this yarn shop very welcoming and comfortable. I loved going there for yarn and inspiration but mostly to enjoy the company of other wonderful ladies. I miss it so much! I'm very happy for the owner though. She had a successful business that she loved and now she gets to enjoy a wonderful retirement with her hubby.
At the closing potluck/party, I noticed the sign hanging outside in the breezeway. I love signs! I have several old ones hanging on my walls at home. And, this one would be so special. Hmmmm?! I thought that, maybe, they might not want them and decided to ask if there was any chance I might be able to have one or buy one (there were two signs, one on each side of a lighted box). She seemed to be more than happy to pass them along. The next thing I knew, her husband was outside, on a ladder, taking the signs out. They graciously gave them to me and another one of their devoted customers. I was thrilled and honored to receive such a great souvenir of this beloved yarn shop.
I knew immediately what I wanted to do with the sign, carefully loaded it into my SUV and couldn't wait to get home and show my husband. We soon went shopping for supplies and he built a nice frame to protect and showcase my new treasure. It will be the crowning touch to my inspiration wall. It's about 50" wide by 14" tall. I love it! Click on the picture to make it larger...

I've been going a little crazy with the black paint! I even painted the frame of an applique butterfly that my grandmother made decades ago...at least 40 years, maybe more. I framed it a long time ago to protect it and I've enjoyed it on the wall for years. It's a simple inexpensive oak frame and, with the black paint, I think it will work out well in this grouping. It's 10" x 12"...

I've run into a snag with this "inspiration wall" project. I had planned to add a round wall clock to the grouping. However, after posting about the coo coo clock and thinking about how I can't stand hearing "tick tock", I decided the clock might not be such a great idea. That leaves a hole in the grouping. So, now I'm working at figuring out how I want to arrange everything and what I'll need to make it just right. So, we haven't started hanging anything yet. I'm hoping it'll be soon though. When I do, I'll be sure to post it right away. :-)
Last month, my favorite yarn shop closed down. I had shopped there for decades. I even went there with my mom when I was a kid! It had been around a long time, under various owners. The most recent owner was a sweet woman that somehow made this yarn shop very welcoming and comfortable. I loved going there for yarn and inspiration but mostly to enjoy the company of other wonderful ladies. I miss it so much! I'm very happy for the owner though. She had a successful business that she loved and now she gets to enjoy a wonderful retirement with her hubby.
At the closing potluck/party, I noticed the sign hanging outside in the breezeway. I love signs! I have several old ones hanging on my walls at home. And, this one would be so special. Hmmmm?! I thought that, maybe, they might not want them and decided to ask if there was any chance I might be able to have one or buy one (there were two signs, one on each side of a lighted box). She seemed to be more than happy to pass them along. The next thing I knew, her husband was outside, on a ladder, taking the signs out. They graciously gave them to me and another one of their devoted customers. I was thrilled and honored to receive such a great souvenir of this beloved yarn shop.
I knew immediately what I wanted to do with the sign, carefully loaded it into my SUV and couldn't wait to get home and show my husband. We soon went shopping for supplies and he built a nice frame to protect and showcase my new treasure. It will be the crowning touch to my inspiration wall. It's about 50" wide by 14" tall. I love it! Click on the picture to make it larger...

I've been going a little crazy with the black paint! I even painted the frame of an applique butterfly that my grandmother made decades ago...at least 40 years, maybe more. I framed it a long time ago to protect it and I've enjoyed it on the wall for years. It's a simple inexpensive oak frame and, with the black paint, I think it will work out well in this grouping. It's 10" x 12"...

I've run into a snag with this "inspiration wall" project. I had planned to add a round wall clock to the grouping. However, after posting about the coo coo clock and thinking about how I can't stand hearing "tick tock", I decided the clock might not be such a great idea. That leaves a hole in the grouping. So, now I'm working at figuring out how I want to arrange everything and what I'll need to make it just right. So, we haven't started hanging anything yet. I'm hoping it'll be soon though. When I do, I'll be sure to post it right away. :-)
Sunday, September 19, 2010
Swirly Bag
I just finished up a little knit bag. It's swirly and cute and it's made out of one of my favorite kinds of yarn, Sugar N Cream. I bought four skeins in this "Country Side Ombre" color a couple of years ago and have been on the look out for just the right pattern. I recently ran across the "Jamaica Pouch" pattern on Ravelry and thought it might be a great match for my yarn. I think it worked out pretty well...

For the drawstrings, I used ribbon and beads to dress it up a bit...

I love the ruffly top when it's closed...

The bottom is kind of swirly too, but in a different way...

This fun little project only took two little skeins of Sugar N Cream (about 190 yards) with size seven needles. That means I still have two skeins left! The cost of this bag was practically nothing because the yarn was only a couple of dollars, the pattern was free, and I had everything else.
The greens are fairly accurate in the photos but it actually has purples and lavenders in it, not blue. I tried to correct it through editing but it just wouldn't work. It's actually a lot prettier in person. :-)

For the drawstrings, I used ribbon and beads to dress it up a bit...

I love the ruffly top when it's closed...

The bottom is kind of swirly too, but in a different way...

This fun little project only took two little skeins of Sugar N Cream (about 190 yards) with size seven needles. That means I still have two skeins left! The cost of this bag was practically nothing because the yarn was only a couple of dollars, the pattern was free, and I had everything else.
The greens are fairly accurate in the photos but it actually has purples and lavenders in it, not blue. I tried to correct it through editing but it just wouldn't work. It's actually a lot prettier in person. :-)
Wednesday, September 15, 2010
Day in the Desert
I visited a good friend of mine at her beautiful desert home on Monday. I enjoyed the drive along quiet, winding, country highways. The skies were blue with puffy white clouds making shadows that floated gently over the hills. The landscape was covered in wildflowers...little yellow ones, white and even some pale blue ones. The flowers that stood out the most and covered much of the landscape were the "Red Shank Chaparral". They are like small trees or big bushes and they're covered in teeny, tiny flowers that were once white but are now turning beautiful golden, Fall colors. There were tons of them!...

I always love going to visit my friend. She's so sweet and so much fun. And, she has a Southwest style home that is beautiful and inspiring. She and her husband are very creative and always have something new and amazing to see. This entry is new since I had last been there. Isn't it gorgeous?! I love how their kitty and doggy casually come and go as they please. Life is good!...

This is the top of their garage...

The inside of their home is beautiful too but I don't want to invade their privacy too much by showing a lot of photos...even though I took more. I couldn't help myself! I love their home!
There was a lot to see outside too. She has two llamas. They're in their 20's! It was hot, so she turned on the hose and they strolled up the hill to have their legs sprinkled and cool down. I love llamas!!!...

I've never seen a cactus with so many fruits at one time. They are loaded! Aren't they pretty?! I'd love to see what they look like on the inside and try cooking with them. Wouldn't that be fun?!...

As we strolled around the property we found more fun things. These are Elderberries...

They're so tiny! We tasted them but they didn't seem to have much flavor. Maybe it's because they're so small. It'd be fun to try making Elderberry wine though...

We aren't sure what these are but they sure are pretty!...

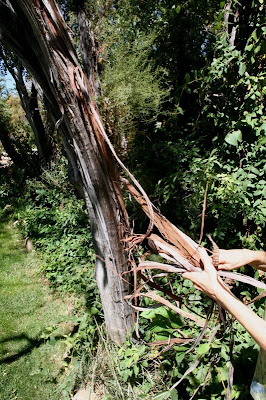
She called this "Ribbonwood". The bark peeled off and it was so long, just like ribbon...
After strolling around her property and visiting for a while, we went into the small town nearby for a Mexican food lunch. Yum! Then back to her house on the hill for a little more visiting time before I enjoyed the peaceful drive home. Going to visit her is always a treat! :-)

I always love going to visit my friend. She's so sweet and so much fun. And, she has a Southwest style home that is beautiful and inspiring. She and her husband are very creative and always have something new and amazing to see. This entry is new since I had last been there. Isn't it gorgeous?! I love how their kitty and doggy casually come and go as they please. Life is good!...

This is the top of their garage...

The inside of their home is beautiful too but I don't want to invade their privacy too much by showing a lot of photos...even though I took more. I couldn't help myself! I love their home!
There was a lot to see outside too. She has two llamas. They're in their 20's! It was hot, so she turned on the hose and they strolled up the hill to have their legs sprinkled and cool down. I love llamas!!!...

I've never seen a cactus with so many fruits at one time. They are loaded! Aren't they pretty?! I'd love to see what they look like on the inside and try cooking with them. Wouldn't that be fun?!...

As we strolled around the property we found more fun things. These are Elderberries...

They're so tiny! We tasted them but they didn't seem to have much flavor. Maybe it's because they're so small. It'd be fun to try making Elderberry wine though...

We aren't sure what these are but they sure are pretty!...

She called this "Ribbonwood". The bark peeled off and it was so long, just like ribbon...

After strolling around her property and visiting for a while, we went into the small town nearby for a Mexican food lunch. Yum! Then back to her house on the hill for a little more visiting time before I enjoyed the peaceful drive home. Going to visit her is always a treat! :-)
Subscribe to:
Posts (Atom)