Friday, July 21, 2017

Tropical Blues

I just finished tucking in the ends of this gorgeous, turquoise, chunky throw.  I wish you could see it in person because the color is breathtaking!  It's hard to get it to turn out right in photos though.  The only way I was able to come close was by having warm tones of the table and the seashells in the photo.  The colors went all wonky whenever I tried to go in close without those things in the photo.  Oh well.  Close is better than nothing.  And, the seashells are perfect because the throw colors remind me of tropical seas.


This project started out as something completely different.  The original project only used one kind of yarn (with several strands held together) and was a knitted cable throw.  It was exciting to try out giant, size 50 needles.  However, I quickly lost my enthusiasm for several reasons....it went much slower than I'd anticipated with those giant needles; the giant knitted stitches/loops made it hard to figure out where I was what was what with the pattern; and those giant needles caused pain in my shoulder because of the exaggerated movements required to knit with them.  So, it sat in time out for a long time.  I eventually came to the conclusion that this would never get done.  I had no desire to work on it again.  And, I wasn't even excited about the throw pattern anymore.  So, I ripped it out a couple of weeks ago.


I decided that I really wanted to make another "5 1/2 Hour Throw" (that's the name of the free pattern on Ravelry but it takes longer than that to make).  I'd made several and really enjoy crocheting them.  I figured I had enough of the chunky yarn.  I just needed some accent colors to go with it.   I had some ideas in mind but came home with totally different yarn and colors than I'd planned on and I sure am glad I did!  They turned out to be a gorgeous combination!

The chunky yarn is Loops and Threads Charisma.  The other two are Caron Simply Soft in Pagoda (the dark teal) and Blue Mint (the turquoise).  The three strands are held together throughout the entire project.


Something happened that I found interesting.  I started two skeins of Caron Simply Soft at the same time but one ran out way before the other.  I wonder if one was way short of the yardage, the other way long, or ???


I love this throw!  It's my favorite color, it's beautiful, and it's super soft and squishy!

It didn't use up all of the yarn from the original project.  I still have several skeins left.  And, I have about 3/4 of a skein of each of the Simply Soft colors.  I did, however, get something out of it that I love.  That old project is no longer hanging hanging over me and waiting to be finished.  And, I have an idea of something to make with the leftovers.

This will be number 30 in my Create 52 Challenge. 

Wednesday, July 19, 2017

Re-fashioned Denim, Fun Fashion Finds, and Confidence

My mother-in-law went through her closet recently and pulled out a lot of stuff she wanted to get rid of.  She asked my daughter if she'd like to come over to see if there was anything she wanted.  My daughter and I both found several things that we brought home.  We've been busy re-making them into different, more current, fashionable clothing.

The first one I worked on was a long denim skirt.  It went almost down to my ankles.  I think it must have been from the 80's or 90's.  It's a high quality skirt and the top of it fit great.  So, I shortened it for a more current and stylish look.  It has nice deep pockets on the sides too.  I love that!  I even had thread that was the perfect color to match the faded yellow on the other parts.  Cool!


I wasn't quite sure about this dress.  It was a little funny.  But, I love denim so much!  And, I have a memory of a super cool denim dress I bought in the 90's that I ended up returning because I wasn't sure I'd be brave enough to wear the very fitted style that it was.  This dress is different but there was something about it that reminded me of that one.  So, I had to go for it.  Oh, and a cool side note...not only is it great to be up-cycling old clothing but this dress was made in the USA!

Oh that ruffle!  And, the raw, frayed edge!  Oy!  lol


I removed the ruffle.  It turned out that the edge that was left was already surged.  That was nice.  All I had to do was fold it over and stitch it down.  I wasn't quite sure if the tapered look would work or if a hem on the thick denim would even hang right.  But, I think it works.  As far as the top goes, I opted to just cover it up.  It fits funny at the top and there's a tiny hole in the middle that looks like it might have had a flower or something attached at one time.  I have plenty of scarves and shawls and several of them looked great.  I went with a more summery one for the pics.

Oh, and pics!  Yikes!  I've been working at being braver to post pics of myself.  I've gotten better.  It's still weird though and uncomfortable even having my daughter take pics of me.  But, I went for it and got a few I'm fairly happy with it.  I'm not going to let myself wimp out on posting these!  So, here it is....my new, up-cycled, re-fashioned dress...


I've been working on being braver with fashion.  There are looks that I love but I tend to go safe.  My usual way of dressing is jeans and casual shirts.  I'm doing better.  So, now, I'm trying to be even braver and trying not to worry about parts of my body showing....like my legs.  I've been wearing shorts all summer and even some skirts!


I found these awesome boots a few weeks ago at a thrift shop.  I love them!  So, I got them and I'm determined to be brave enough to wear them.  And, now I have an outfit that goes with them.  So, no excuses, right?!  Gulp!


I hit the shoe jackpot the day I found these!  They were only $5!  They're leather and in great shape.  I looked up the brand online and found out that these boots were over $100 when they were brand new!  These look like they've barely been worn.  And, for heels, they're actually pretty comfortable.


I found two other pairs of shoes that day for just $4 for each pair.  They're in great shape and look like they've barely been worn too.  Those who've seen them think they're high dollar too.  I'm still working on finding outfits for them.  


They're definitely beyond what I normally wear but I love them.  So, that's a perfect reason to be braver and bolder to get to a place where I can wear things like this that I love!

How do you all feel about fashion?  Do you stay in a safe zone with what you normally wear?  Do you see things you love but aren't sure you could do it?  Do you worry about an imperfect body like I do?  Are you nervous about trying to be more stylish or letting parts of you show?   I'd love to hear how others feel about this.

I've always been SO self conscious about my skinny bird legs.  As I've been working lately on being OK with me, I've noticed that there are beautiful people out there with skinny legs.  The difference seems to be confidence.  That's what I'm attempting to have!  I'm trying to love what I've been given and make the best of it.  And, besides, I'll never be as young as I am today!  So, why keep waiting?!  Watch out world, here I come!  Gulp!

Tuesday, July 18, 2017

Scrabble Markers

I finally got around to finishing up another project that had been in the works and waiting to be done for quite a while.  I made Scrabble tile crochet markers.  They are letters that correspond with crochet hook sizes.  When I start a project, I simply place the hook size marker on my project.  Then, there are no worries about losing my hook and not knowing what size I was using.


I collected letters of sizes I use most often and a few others.  There are several of each of the more commonly used sizes.  I used a few different sizes of clips for different thicknesses of yarn.  And, they store nicely on a ring to keep them all together.

I'm not sure if I'd seen some like these already made up or if I got the idea from other things made with Scrabble tiles.  Either way, I started searching for and collecting Scrabble tiles a few years ago for this project.  


Hubby helped me build a tiny jig to put the tiles in one by one to drill and get all the holes in exactly the same spot.  It was fun using the drill press!


It'll be nice using these and not worrying quite so much about my hook getting separated from my project or setting it down next to another hook only to forget which one I was using.

Yay!  Another project completed that's been in the works.  And, another project for my Create 52 challenge.  This one makes number 28 and keeps me caught up.

Saturday, July 15, 2017

My New Wheel

I've wanted a double treadle spinning wheel for a long time now.  And, I've wanted a wheel that is more portable than the Ashford Traditional and the Country Craftsman wheels that I have.  I just couldn't justify buying one since I had two wheels that worked just fine.  However, when my Traditional wheel broke a few months ago, I felt it was time.

I was loading it up in my car and heading to Tucson to see my daughter.  I was planning to take some private spinning lessons from someone I'd met there.  When I got to my Tucson and took it out of the car, a big section of it fell off...the part with the uprights, the bobbin, etc.  A piece of wood that attaches it all to the wheel had snapped in half along the grain line of the wood.  I have a feeling it's not meant to be transported a lot...even though I try to be very gentle with it.  However, most of the spinning I do is when I'm meeting up with other spinners somewhere other than home.

That was a perfect time for it to break though because there's a yarn shop in Tucson called Grandma's Spinning Wheel.  Which, as you might guess, sells spinning wheels.  I paid them a few visits to test out the many wheels they carry.  I'd dreamt for years about getting an Ashford Joy wheel.  I love the idea of how they fold up and fit into a handy carrying case.  However, when I had the opportunity to test it out, I really didn't like it.  I also couldn't justify the high price for a wheel that seemed so delicate.  I ended up falling in love with the Ashford Kiwi.  I had fallen in love with a Kiwi years ago when I tried one out but to like this wheel over all the other high dollar ones was surprising.  A very nice surprise!  The cost was about half.

I ordered one that was unfinished to save a little more money.  And, I thought it would be nice to personalize it.  I had grand ideas of painting beautiful things on it and lots of bright happy colors.  I decided against doing that when I imagined all of that flashing at me as the wheel spun round and round.  So, I went for a simpler design...I painted the wheel in my favorite color and gave the rest a subtle stain with a satin finish.  I'm very happy with the results.  I think it's beautiful!


I have to admit that there were many times I'd wished I'd splurged on a finished version.  I don't enjoy sanding and I was worried that the stain wouldn't work out or that the whole thing wouldn't turn out nice.  Luckily, my hubby loves to sand, stain, paint, and finish things like this and he was more than happy to help out.  In fact, he did a lot more work on it than I did.  But, it was a lot of fun working on it together with the stain and then putting it together.

There were a lot of parts!  And, this picture doesn't even show the bag of hardware for putting it all together!


Since my new wheel is my favorite color, it made sense to have my first bit of spinning on it be in that color as well!


I'll post a pic of the yarn when I get some done.  I've had a crazy, vertigo, sinus thing going on for most of the week that's prevented me from doing much of anything.  I'm hoping to get back at it now that I'm starting to feel a bit more normal.

Monday, July 10, 2017

Cooler Coastal Hikes

The weather here has been very hot.  That continues to make our 52 hike challenge even more challenging.  Luckily, we live within about an hour drive from San Diego and that has helped us keep up.  We did our city hike in San Diego a few weeks ago.  We've hiked the past couple of weeks at Torrey Pines (also in San Diego County).  It's been warm and humid down there but so much nicer than the record temps of over 100 at home.  And, the views...WOW!  Gorgeous!

Click photo to see it larger....they're so much more fun to see that way.  You can even click through them from there to see them all larger.


The red ice plant on some of the hills is surprising sight.


I took my daughter there the first time and we hiked over six miles.  There are so many more trails there than I realized.  That's cool!

Hubby went with me the second time.  We hiked some of the same trails I hiked the first time but the tide was low this time and we were able to hike down to the famous flat rock in the water.


The beach next to that big flat rock is covered with interesting rocks.  This one looks like an ear...


It always amazes me at how dry and desert like the landscape is right next to the ocean.  It seems like all the humidity and moist ocean breezes would make it more lush and green.  There are even cactus!  But, there are lots of pretty flowers.  Here's an interesting one with beautiful color...


I love the color of these and they're so cute!


Teenie, tiny, wild snapdragons...


There are LOTS of yellow flowers...


And, white ones...


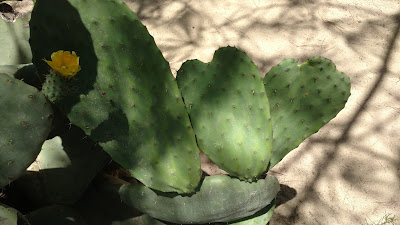
Heart shaped cactus and a cactus bloom!


What a beautiful day!


 Hubby and I had a wonderful day together!  We started the morning off with cappuccinos at our favorite coffee roaster in Encinitas, Ironsmith.  Delicious!  They are the best!  They're SO skilled at what they do and have the most delicious cappuccinos!  Then, our hike and walk along the beach.  We finished with lunch at a yummy Mexican restaurant.

Our daughter hiked one of the Southern California Peaks that day....16 miles in one day....up to a 10,649 feet!  Wow!

We've kept up pretty well with our challenge and have officially reached half way.  However, we are now one week behind because of another week of record high temps that even had the beaches sizzling.  It's supposed to cool down slightly this week.  We'll see what we can figure out to get caught up.

Thursday, July 6, 2017

Bikini Top

I did it!  I successfully crocheted a bikini top without a pattern!  Whew!

I started this project about a year ago when I  became fascinated by crochet clothing projects I'd started seeing that were made without patterns.  It was an exciting challenge that I wanted to try.  I watched a few tutorials on cup shaping (they were in a different language) and got started.  That part was pretty easy.  I completed the cups and bottom band pretty quickly.  The straps and back, however, posed a bigger challenge.  I wanted to be sure they'd work and look good.  Not quite knowing how I wanted to make them, I ended up setting the project aside.  Over the past year I've looked at swimsuit tops, sports bras, and searched through patterns and project photos to get ideas.

This week, I finally decided to just go for it!  I had an idea of how I wanted to work the straps and worked it out as I went along.  And, now, ta da!...It's done!


In some ways, the back is very close to what I had in my head.  In other ways, it's better.  The best part is that it actually works.


It looks a bit different on my dress form than it does on me but this was the best way to get photos.  And, honestly, I'm still working on just going for it with wearing it.  I figured all along that I could at least wear it in my back yard for some sun time or gardening.


I've never been very comfortable in my own body.  So, wearing something like this would have been a challenge for me at any age.  However, at 55, I've decided that if I ever want to feel comfortable in my own skin that I need to push myself and go for it.  After all, time flies by and I'll never be this young again!