I love Sugar N Cream yarn! I love the colors. I love that it's cotton. I love that it's cheap. I love it so much that I have lots of colors of it in my stash. There's one color I didn't have that I've been watching for and I finally found a ball of it a couple of weeks ago. It's not bright and cheerful or very colorful...it's natural ecru and it's beautiful because of that.
I also found a little Leisure Arts doily pattern booklet and decided to try one of the patterns, "Vanity Fair", with this yarn and a large "H" hook. I loved the designs and shapes in this pattern but it turned out to have a lot more texture than I liked, especially with bulky yarn. So, I did a lot of modification to get the same design but in a flatter, smoother version.
I changed out the popcorns and clusters with half doubles or trebles pulled together at the top, and front post stitches with regular stitches.
I think it looks nice on the craft studio table where it can be used as a placemat for snacks or a coaster for a drink, a pad for my laptop, or just to look pretty.
Friday, July 30, 2010
Thursday, July 29, 2010
Ramblin' Roses
My skein of Pagewood Farm, Willow Creek, laceweight yarn that I bought last fall in Colorado may be my hands down, all time favorite yarn. It's handpainted in pinks and greens which is one of my favorite color combinations. It's soooo gorgeous! It was love at first sight and the more I've looked at it and worked with it, the more I've fallen in love.
It looked good in a skein and it looks good wound into a ball...
It looks good wound around the ball (my ball winder is a bit small)...
It's just beautiful!
When I purchased the 675 yard skein, I imagined a lacey shawl. It looks great in a knitted swatch. But, since lace knitting isn't my thing...yet...I decided to try and crochet it into a lacey shawl. Watching those colors go by as I stitched was so much fun! The colors remind me of antique roses. So pretty...
It even looked good with the "I" hook that I used...
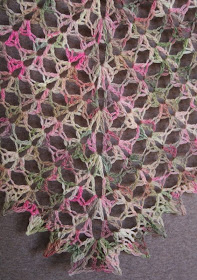
And, it looks good blocked...
It grew from 44" wide and 23" long to a wonderful size of 60" wide and 30" long. I love it!
This is just the size I was hoping for. Here it is from the back...
A close up...
This is most likey how I'll wear it...as a scarf, a dash of color and texture, a flourish...
This shawl is from the "Mock Faroese" pattern that I used for my "Durango Shawl". It looked so great in the varigated yarn I used for the "Durango Shawl" that I thought it would be a great match for this yarn. I think it worked out really well! The colors of the yarn look very "antique" to me and I thought about naming it "Vintage Rose" or "Antique Rose". However, I decided to name it "Ramblin' Roses" because I think it sounds better and it looks like roses ramblin' all over the shawl.
I feel so lucky to have found this gorgeous skein of yarn! The color is "Army Girl" and I've seen several since but since they're handpainted, they're all different and none of them have been as pretty to me as this one. If I ever find another one like it, or two, or three...I'll be sure to buy them all!
Saturday, July 24, 2010
New Look
Ok...I tried to fix my blog. I tweeked it and tweeked colors and I just wasn't happy with how it looked...Until tonight. I think I finally found a look that I'm happy with. It's fresher and brighter but it still has color, which I love...and it's blue, my favorite...and I have some interesting pattern on the sides. Yay! :-) What do you think?
Friday, July 23, 2010
Please Pardon My Dust...
...my blog is undergoing a bit of repair work. I checked my blog this afternoon and the background had been deleated. I finally figured out how to get it back and now I'm tweeking text colors and sizes to try and get everything to look right. The new Blogger Design feature is nice but troublesome!
Thursday, July 22, 2010
Sew Challenging!
I just finished sewing a top! I was inspired last year by the "Made by Rae" blog. She had a "Spring Top Challenge" where readers made tops, sent in pictures and she posted them on her blog. It was so cool! I wanted to join in on the fun. So, I went out last year and selected a pattern that I thought I could make, the fabric, and everything I needed to get started. Yup...you read it right...that was last year (2009). I found this to be challenging from beginning to end.
The challenge started with pattern sizing...the same thing that has kept me from sewing many other times. I looked at my measurements on the pattern chart and it said I needed to make a size that's four to five sizes larger than I'd buy in the store! That's crazy and makes no sense to me. Since I don't have much garment sewing experience, I decided to go with it...sort of...I went down a size from what the pattern suggested. But, it's still turned out wayyyy too big! I took in two inches on each side, under the arms and it helped a bit. I didn't wash the fabric before I made this. So, I'm hoping for some shrinkage in the washer and drier. Either way, it'll be a nice top for wearing around the house on hot summer days. And, I do think it's kinda cute. I love the fabric.
Another challenge that I ran into was the directions. I've heard that some pattern brands aren't as good as others. Maybe this is one of them (Simplicity 2962). The directions seemed to leave out so much detail that I needed in order to understand what I was suppose to do. I started it last year but set it aside when I got to a section that I just couldn't figure out. Luckily, I'm currently in the mode of cleaning up, organizing, and finishing up projects that have been either half done or left in the idea stage. This was one of those finishing up projects and I was determined. So, I decided to just figure out a way to make it work and I did!
The back has little ties. I think they're a bit narrow for the scale of the top and I may take them off because I don't like to lean back on a bow/knot anyway. It's uncomfortable.
A couple of steps were easy, fun, and I'm happy with the results... The pleats...
And, the pockets... The elastic gather at the tops is so cute...
The final challenge in this was getting good pictures. The pictures kept coming out too bright and losing detail, too dark, or the colors didn't look right. Oh well, it's done and I'm so happy that I beat this challenge! Yay! And, now I have a nice, cool, comfy, new top for summer. It was so/sew challenging but I just might try making something again. ;-)
Wednesday, July 21, 2010
Looking for a Good Home
In my last post, I told about how I recently organized my yarn stash and had it down to two bins. That's my personal stash of yarn that I love and see possibility in. I do have some other bins of yarn and roving for my fiber business but it's all for selling, not for me...well, unless I really need it for something. ;-) My personal stash has shrunk from so many recent FO's and because I have a big pile of yarn that I no longer want and would like to find a home for...
I got a great deal on all of these cone yarns years ago and have woven so many rugs and great things with the big chenille that I can't imagine making any more. It does weave up nicely though for bath mats like the ones I posted HERE. I also wove a huge blanket with it years ago and it's my hubby's favorite, curl up on the sofa and take a nap or read blanket. Some of them just haven't inspired me. And, it turned out that a couple of the ones I liked aren't cotton like I thought.
The big bag is 10 pounds of selvedges that I bought years ago at the Pendleton Woolen Mill in Washougal, Washington. They told me that it can be woven into a nice thick shaggy rug. That sounded exciting at the time but I never got around to it and I don't think I ever will. I love that it's from Pendleton though and the colors are rich and pretty.
All of these cones and the bag of Selvedges are available for adoption, free of charge (or for the cost of shipping) to anyone who is interested. If I don't get any takers, I'll contact a weaving guild to see if they may want it. As a last resort, it'll go to charity for a thrift shop. I've decided that it just doesn't make sense to keep them around if I'm not using them. Getting rid of them leaves more space to breathe and create in my new studio and space for new materials to create with.
If anyone is interested in this stash, please email me with any questions. I can describe the yarns, weigh them, send more pictures, whatever you need.
Thanks for stopping by! :-)
Saturday, July 17, 2010
Stashin' and De-Stashin'
I love yarn! But, having a big stash of it is not my thing. I like to keep my stash down to a minimum and I try to be careful about what and how much yarn I buy. There are times when I'll buy yarn just because it's beautiful but that's rare and I try to have some possible projects in mind before I make the final decision to buy some. So, my stash has been really small compared to the size of so many other knitters and crocheters that I've talked to. But, it's still been larger than I wanted. So, I've been working hard on trying to use up a lot of it this last year or so. I recently went through all my yarn and found that I only have one storage tub of whole skeins or large enough amounts left for projects and one tub of left overs from projects. Yay! My crochet lace shawl frenzy has helped a lot. I'd like to get my good stash down to half a tub or less. I'm not sure what to do yet with all the leftovers... maybe some more freeform projects or magic yarn balls.
Yesterday I ran into a little snag...
Ok...it was a sale. Could I have ignored it? Probably. Did I? Nope. How could I?...all the sock yarns were 40% off! And, right now, I've got an addiction...crochet lace shawls...and I need yarn to support my habit...and I was low on sock yarn...and Christmas is coming...and the colors were pretty...and, did I mention that it was 40% off?! Ok, I was weak...but isn't it pretty???! More shawls are on the way! :-)
Friday, July 16, 2010
Floral Friday
Doesn't this look like something from under the sea?...
It's odd looking but pretty. It's a flower on the Brisbane Box tree in our back yard. The tree is native to Australia and it somewhat reminds me of Eucalyptus as it has similar pods and leaves. The ants seem to like it too.
Have a wonderful weekend! :-)
It's odd looking but pretty. It's a flower on the Brisbane Box tree in our back yard. The tree is native to Australia and it somewhat reminds me of Eucalyptus as it has similar pods and leaves. The ants seem to like it too.
Have a wonderful weekend! :-)
Thursday, July 15, 2010
South Bay Shawlette
I just couldn't resist making another "South Bay Shawlette". I made one a couple of weeks ago in purple and called it my "Lupine Shawlette". It turned out so pretty and friends who have seen it love it. So, I offered to make one for a local yarn shop, Daily Fiber, for use as a display.
This one is made with a size "I" crochet hook and a ball of Berocco Sox yarn. I absolutely love the colors!
When I made the "Lupine Shawlette" I didn't see the final edge row on the pattern and left it off. I left it off by choice on this one. It's a row of single crochets and slip stitches around the entire shawl. I think it would look too thick and bulky and take away from the pretty, delicate edge. I don't think I would have had enough yarn for it on either shawl anyway.
This yarn is a bit scratchy and, like many Berocco yarns I've used, I experienced knots! Ugh! There were four breaks in the yarn with knots in this one ball. Because of that and having to leave tails to weave in, I lost some yardage and this one is a bit smaller. It is long enough though...50" wide at the top.
All the blues and greens are so pretty!
I have a feeling that this won't be my last "South Bay Shawlette". The pattern is just so pretty and fun to make.
Tuesday, July 13, 2010
Colorful Grays Peak
Last weekend we went for a hike to Grays Peak. The trailhead began just above the Fawnskin side of Big Bear Lake in the San Bernardino Mountains. Here's the sign at the bottom...
Salsa came too...
And, like everywhere we went on our vacation, there were tons of wildflowers. I've never seen so many flowers in our mountains! There was so much color! Much of the trail was lined with these...
There were big patches of flowers that look like snapdragons. Check out the little tuft of hair inside...
There were golden flowers...
Brushy looking flowers...
Berries...
Itsy bitsy...
and teeny tiny flowers...
We only saw two of these the whole day. They remind me of a couple flowers I saw in Colorado that were very similar. Amazing...
I love the colors in this one...
These covered the ground like carpet in some places...
Check out all those ruffles in this close up...
We even saw stars...
Or...maybe flowers...in some of the trees that were cut down (they may have died from the beetle infestation). We'd never seen this shape/pattern in logs before...
There were so many flowers that I can't possibly show all of them...even patches of deep purple ones! The sky was blue and clouds slowly rolled in as we hiked, giving us a little shade from the hot sun. We had lunch at the top of the peak with a 360 degree view all around of mountains, the lake, the desert. And, we were treated with a magic dance of beautiful butterflies that were only at the top. This one eventually landed and I got a picture. Isn't it gorgeous?!...
It was a fun day and a great workout. We hiked almost seven miles with over a thousand feet of elevation gain. The scenery was amazing. And, the time together...my husband, daughter and I...and Salsa...priceless!
Thursday, July 8, 2010
Floral Friday
A few more pretty wildflowers from my vacation...
I found this one on my last trip into Mesa Verde. It was on the Mesa above Long House. There were just a few of them and they were the only ones I've ever seen. Isn't it amazing?!...
These were in Williams, Arizona alongside the road. They're small and so cute with their pink stripes...
Lots of these were growing by the little striped ones. So pretty...
Have a beautiful weekend! :-)
Tuesday, July 6, 2010
Durango Shawl
When we went to Colorado a few weeks ago, I went prepared with a list of yarn shops in the areas near where we were staying. We went to the Southwest corner of Colorado and there's not much there. So, there weren't a lot of choices and some of those were out of business or not yet opened for business. But, I did find one...It was "Shadow Ranch Fiber Hut" in Cortez. It was about a block off of the main highway. It's small but had some pretty yarns and the owner was very nice.
I purchased two balls of Plymouth "Sockin' Sox" in colors that reminded me of Colorado...green trees, blue skies, the earth...
I searched through patterns for just the right shawl that would have just enough substance to keep me warm...after all, this was going to be my Durango/Colorado shawl...and just lacey enough to make it beautiful, special, and keep it from having that stereotypical "crochet" look. I decided on the "Mock Foroese Shawl" by Lily Chin. I quickly got started using a size "J" hook. Here's how it turned out...
I'm ecstatic about the size. It's exactly what I was hoping for and took less than 870 yards. It's 66" wide at the top and 33" long at the center back.
It's hard to capture it's true beauty in pictures but I did the best I could.
Here it is being blocked...
Here's close up of it being blocked and of the edge detail...
Here it is before blocking...
And, after...
I wanted to add something a little more special to the edge than what was in the pattern. After experimenting with lots of border possibilities, I decided on a a shell type of stitch that works well with the rest of the shawl and has a picot at the ends for a nice finishing touch along the bottom. Here’s how I did it…
I ended on the even row of the repeat (the one with a full shell at the beginning and end). Then…ch 1, turn, sc in first stitch of the shell below, dc in second stitch, in the chain 1 opening of the shell below (dc 1, ch 4, slst in 4th chain from hook, dc 1), then dc in third stitch of shell below, sc in fourth. Repeat what is between the ’s. This repeat will always be on top and even with the shell below it. At the bottom point, there will be two of these picot shells. At the other end, the final sc of the last shell will be stitched into the third chain of the last post below.
I purchased two balls of Plymouth "Sockin' Sox" in colors that reminded me of Colorado...green trees, blue skies, the earth...
I searched through patterns for just the right shawl that would have just enough substance to keep me warm...after all, this was going to be my Durango/Colorado shawl...and just lacey enough to make it beautiful, special, and keep it from having that stereotypical "crochet" look. I decided on the "Mock Foroese Shawl" by Lily Chin. I quickly got started using a size "J" hook. Here's how it turned out...
I'm ecstatic about the size. It's exactly what I was hoping for and took less than 870 yards. It's 66" wide at the top and 33" long at the center back.
It's hard to capture it's true beauty in pictures but I did the best I could.
Here it is being blocked...
Here's close up of it being blocked and of the edge detail...
Here it is before blocking...
And, after...
I wanted to add something a little more special to the edge than what was in the pattern. After experimenting with lots of border possibilities, I decided on a a shell type of stitch that works well with the rest of the shawl and has a picot at the ends for a nice finishing touch along the bottom. Here’s how I did it…
I ended on the even row of the repeat (the one with a full shell at the beginning and end). Then…ch 1, turn, sc in first stitch of the shell below, dc in second stitch, in the chain 1 opening of the shell below (dc 1, ch 4, slst in 4th chain from hook, dc 1), then dc in third stitch of shell below, sc in fourth. Repeat what is between the ’s. This repeat will always be on top and even with the shell below it. At the bottom point, there will be two of these picot shells. At the other end, the final sc of the last shell will be stitched into the third chain of the last post below.