Thursday, September 27, 2012

Fine Details

My husband and I went up into the local mountains last weekend and camped.  We had looked forward to four days of relaxation and cooler temps.  The temps were cooler than at home but not anything like the cool mountain air we had hoped for.  We went mountain biking one morning but it was so scorching hot that I started feeling awful and we kept it short.  The only other exercise we got were a couple of short hikes and walks around the campground with the dog. When we got out and about from the campground, I played around a little with my new phone and snapped some pictures.  We found some plants with beautiful, feathery seeds.

  These were so pretty, glowing in the morning sun.
The fine details are amazing.


All the little swirls remind me of photos where the camera shutter
has been kept open and lights have moved about to draw swirly designs.


The feathery coverings on these seeds look even softer.
Click on the picture for a a better, closer look.


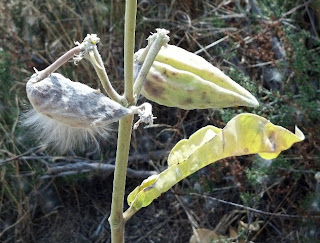
I'm not sure, but it might be some kind of milk weed. 
They're popping out of pods like this...


The soft, fluffy coverings on these seeds are longer and look like soft hair.
It appears that something on this plant must be quite tasty to these bright red bugs.


I'm impressed with the photos I took with my new Razor phone.  I was surprised to see how many features it has, including macro, zoom, various lighting and color options, etc.  It even has a feature that takes panoramic photos and it matches the scene as I turn and snaps automatically as needed.  And, I love how I can just tap the screen where I want it to focus.  I have a lot of playing and learning to do with it.  Not to mention LOTS of learning with the phone in general.  It's my first "smart" phone and I was very frustrated with it for the first few days.  I'm starting to get the hang of it now but...as with the camera feature...I have a LOT to learn.

As for our long weekend...it was a nice getaway.  Hubby did a lot of reading while I did a lot of knitting.  We enjoyed our time together along with good food, drink, and the beautiful scenery of the Idyllwild area.  It's one of my favorite local places.  I'm always amazed that it's only about an hour from home and so worth the drive every single time we visit.  

Saturday, September 15, 2012

Fabulous Find

Our dining room has been a music room for years.  It has been home to a piano, harps, various small instruments, music and supplies.  But, now that my daughter has gone off to college and taken her harp, it's looking a bit bare.  I think it's time to turn it into a dining room.  And, just last night, I was on the internet looking at dining tables and decorating inspiration.  I need and want to do it all on a very small and creative budget

Fast forward to this morning...hubby and I were headed to the gym for a workout but before we even got out of the neighborhood we spotted a yard sale that looked like it was worth stopping for.  I'm so glad we did!  We found this dresser, a matching mirror that attaches to the back, and a nightstand.  All for only $30!  The size was just what I was looking for to use as a buffet in our dining room.  I like the look, the details are really nice, and the price was great!  It took only seconds to decide we wanted it.  If we had gotten there any later, it probably would have already been sold.


After we bought it, we looked it over more and realized it was a high end brand...Henredon!


I know we got this for a good price even if it was a no name piece.  But, this changed everything.  This brand is quite expensive new.  The MSRP on a similar dresser is about $10,000.  But, used, it's still pricey.  I found some of similar size going for $600-$2500!  It's not all in the name either.  It's actually a good quality piece of furniture.  It's all solid hardwood...no particle board or plywood!  It's very well constructed with dove tail joinery, hardwood sides and bottoms for the drawers, nice hardware, and beautiful details.  I love the twisty details on the drawers.  So pretty!


It even has removable dividers in the top, center drawer.  Nice!


The mirror attaches to the back with two bars and the height is adjustable.
It also has hardware on the back for hanging it on the wall.


The fancy detail at the top of the mirror is metal, just like the drawer pulls.  Pretty!


I didn't really want the nightstand but they wanted to include it.  I may use it as a side table.
It even has a built in electric outlet on the inside of the cubby with a hole in the back to run the cord for a lamp or other electric item.  Nice!


There are some scratches that could probably be repaired and polished up but I'm planning to paint it.
I'm so excited!  The size is perfect and it's going to make a wonderful buffet!  The value of it all makes it even more exciting!  I have a feeling the owner didn't realize what she had.  Just like I didn't realize what I was getting until we got it home.  It's a level of furniture I normally couldn't afford...even used...except for this kind of deal.  I'm sure feeling lucky today!  But, most of all, I love it!

Monday, September 10, 2012

Redwood Throw


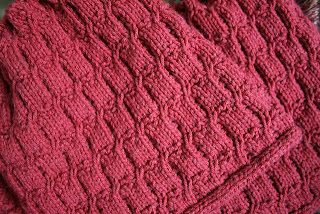
I'm knitting again!  Yay!  And, enjoying every stitch of it!  Life has been so busy for months that it's been a rare event that I've had much time to sit down and play with yarn.  I started knitting a throw way back in May but it's sat lonely in my knitting bag for months.  I've been knitting on it this past week and have completed several repeats of the pattern.  It's growing!  I hope I can keep up the momentum and finish it in time to use this winter.  It'll be a nice project to work on as the weather cools and the throw grows.  It'll keep me warm as I knit on it.  That is...if it ever cools down.

Saturday, September 8, 2012

Stitched with Love

It's done!  My daughter's quilt is finished!

We'd hoped to finish it a couple of weeks ago.  It probably could have been done but life got busy.  
We worked on it when we could.  And, then, she had move and start the new school year at her new college.  I've put lots of hours into it over the past couple of weeks to finish it.  And, I've used lots of band-aids.   I cut myself pretty bad with the rotary cutter one day.  I'm still wearing band-aids for that one.  Ouch!  And, I kept poking myself with pins.  Ugh!  I'm not usually so clumsy with sewing.  But, I made it through.  This project was worth every moment, every drop of blood, every bit of sweat, and every single stitch I put into it.  It represents the amazing and close relationship I have with my daughter, my enormous love for her, and a new chapter in both of our lives.

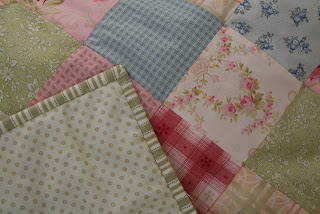
As we worked on plans of what she would need in her first apartment and how she wanted to decorate, I mentioned the idea of making a quilt.  She loved the idea.  And, she loved a set of fabrics I'd bought several years ago.  We just needed to find a few more fabrics and a design.  We ended up making a simple patchwork of squares.  It worked well for our limited quilting experience, the short time we had to make it, and for the look she wanted.  The fabrics have a bit of a retro feel and the colors are exactly what she's into right now.


This is the front...


And, this is the back...


I like to give the back a little something special so the quilt can be reversible.  We had just enough fabric left over from the squares to make a few more rows.  We placed the strip of colors toward one end so that they'd lay across, near the foot of the bed.  It will add a splash of color at the end of the bed and not be covered by all the pillows.  I wasn't able to find yarn in the pale green color to tie the quilt.  So, I ended up with a darker green that matches the dots.  In the end, I love the tufted look it created.


This project would not be complete without the love our sweet Duchess added.
She was around for every stage of it's creation.


She was in charge of quality control!


She thinks we did a purrrfect job!


She knows because she did a little testing before it was delivered to my daughter.
She loves it!


And, so does my daughter!


It added more color and pattern to her apartment bedroom.  Her room at home is mostly white with pale colors and a shabby chic look.  She's been adding brighter colors to her apartment for more of a cottage kind of feel.  I think it's really cute!   Check out those pretty flowers she made and hung over her bed.  They're made with old sheet music.  There are three of them in different sizes.


I think the quilt will add a warm smile to her heart whenever she sees it and wraps up in it.  This will be a wonderful reminder of how much she is loved.  Especially during those days or moments when she might feel a bit homesick or have an extra challenging day.  This is a big step in her life and this should help ease the transition.  Not to mention how much it has helped me.  It feels like a great big package of love and comfort that I was able to give to her as she heads off into this next big adventure of life.  :-)

Friday, September 7, 2012

Illuminating

Earlier this year, we visited a wonderful little store that had a LOT of beautiful things with very high price tags.  I would love to have many of the things they sell but, for me and my budget, I'll just have to use their items as inspiration to create my own.  One thing we saw that day was a gorgeous glass lamp.  It looked like it was made from a tall glass candle stand.  A light socket had been attached to the top with epoxy and the cord hung down the back.  It was close to $500!  I loved it and some ideas immediately popped into my head of how I could make one and where I could find supplies to do so.

Soon after, I popped into a Home Goods store to look for glass candle sticks/stands.  I found lots of choices.  But, I passed up the clear options for some with more color.  I love color!  The first one I decided on was turquoise.  It's a perfect match to the bits of turquoise in our living room sofa.

I created this...


From this...


The base cost less than $10.  To turn it into a lamp, I purchased a lamp kit, harp, and finial from Lowes.  I think that cost around $15.  I found a lamp shade at Ross for less than $5.  The lamp kit came with several rubber bases (kind of like rubber corks) to screw the socket into. They're meant for use with bottles or jugs to turn them into lamps and would be placed in the hole of the bottle.  I marked the center on top of the candle stand and attached one of the rubber bases with epoxy.  When it was dry, I carefully screwed the lamp kit into the rubber base with the harp, added the shade and finial and....voila!  A lamp!

I also bought this silver candlestick/stand.  I couldn't resist!  It's pretty and the price was great.  It was also under $10.  It had a hole in the top for a taper candle.  That made it easy to turn it into a lamp since the lamp kit was made to put into a hole with it's rubber/wine cork-like bases.  None of the  rubber bases that came with the lamp kit were a perfect fit.  So, I used a wine cork.  I just drilled a hole in one end and sawed it down to make it short enough to be flush with the top when I stuck it into the base.  The lamp kit came with a round, flat, brass plate that goes under the socket and covered the cork.


I finished it off with a shade and finial and I had another lamp for around $25.  I love it!


My daughter was shopping with me that day and got excited about the idea.
She found a gorgeous glass stand that looks like mercury glass.


She turned it into this...


The epoxy didn't hold the glass and rubber base together very well.  So, hubby found a metal gizmo to glue down and screw the socket into.  It's a gorgeous lamp!  I love it and so does she.

Wow...while typing this up, I realized that we made three unique lamps for a grand total of about $80.  What a savings from the expensive one that inspired us!  That even beats the price of discount store lamps.  They're usually $25-40 and up for the base and then shades are often $15 or more.  And, these home made lamps are kind of unique.  I likely won't go into someone's house and see the same lamp(s).  I like that.

These were fun projects and I bet it won't be the last time we create lamps.  I look at vases, candle sticks, and all kinds of things differently now.  I've been keeping my eye out for something to turn into a floor lamp.  I love those!   And, we could still use more lighting in our house.

Wednesday, September 5, 2012

Dust Ruffle Addition

My daughter's quilt is almost done!  I'm working on the final stage...hand stitching the binding.  I'm planning a marathon session today to try and finish it up.  I'm planning to visit her tomorrow and I'd love to give it to her and get to see it on her bed.

One of the things that was on our to-do list before she moved was to make a dust ruffle.  We spent some time thinking over the situation and playing with fabrics.  It turned out that the dust ruffle she had looked nice with the new quilt.  The only problem was that her bed was set up lengthwise against the wall and we'd made the dust ruffle to fit on the two short ends and one long side.  She was going to put the head of the bed against the wall in her apartment.  So, the dust ruffle wouldn't quite work.  It was a couple of feet short. Fortunately, we had just enough fabric to make an add-on section to make it work!  It was exactly enough.  We only had one small sliver of fabric left from trimming one side.  Amazing!

We worked together.  We measured.  I folded and pressed the seams.  And, she sewed.


We even had some gathering tape (not sure what the real name of it is) left.  
I love that stuff.  Simply sew it along the top and bottom edges and pull the cords!


It makes perfect gathers every time!


We took a picture before the quilt was finished.  It actually looks a lot better in person.
The colors work well together and the stripes are perfect.
All together, it has a vintage sort of feel and goes well with her sort of shabby chic style.


The original section of her dust ruffle was held in place with velcro.  We simply hot glued the scratchy side to the box spring, the soft side to the dust ruffle, and pressed it into place.  It works really well that way because it stays exactly where it's placed.  Unlike the kind that's sewn onto a piece of fabric that's sandwiched between the mattress and box spring.  They tend to shift around.  This also made it easy to adjust it to the new way she was going to place her bed.  We simply pulled the velcro off of the box spring, on the side we wouldn't need it anymore...it didn't even leave a mark!  Then, we glued velcro to the sections that needed it, pressed the dust ruffle into place and voila!

She's so excited about her quilt!  I had the tying almost finished when she came home for the holiday weekend and she gasped in excitement.  Now, every time I talk with her on the phone,she asks how it's going.  She can't wait!  That sure puts a smile in my heart!  

Oh...and what a beautiful morning to sit and enjoy sewing...it's 73 degrees and raining.  It feels, smells and sounds wonderful!  I have windows open so I can enjoy the peaceful sound, the wonderful smell, and the light breeze.  Ahhhhh!  I love summer rain!